Make a statement with a handcrafted button bouquet, perfect for brides and bridesmaids or simply on display at home.
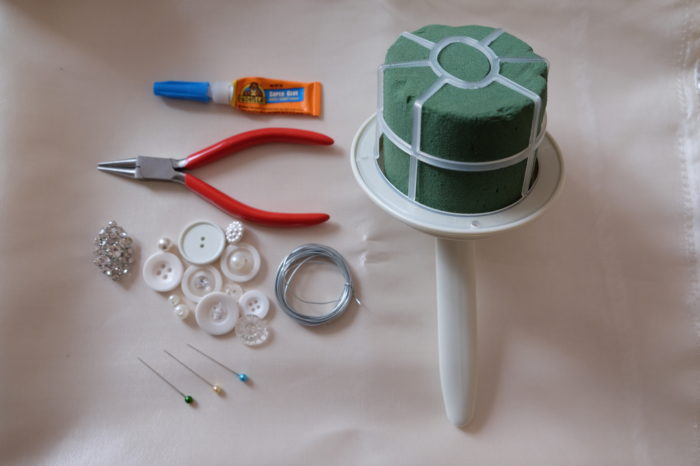
You will need:
Dry foam oasis bouquet
Buttons in a colour(s) of your choice
Vintage brooch(s)
Wire cutters
Craft wire (needs to be thin enough to thread)
Silk, satin or lace to match dresses
Pearl sewing pins
//Step 1// Cut & Thread
Cut 5-inch strips of wire and thread varying numbers of buttons to the wire (we used between 1 and 5), topping each with a bead or fancy button, so you can’t see the wire. They should look like little button flowers. For a 5-inch bouquet like ours you’ll need to make approximately 100 stems of varying size. You might find it useful to display your stems in a little bowl as you work – just so you can what options you have for spacing.

//Step 2// Centre Piece
Thread your vintage brooch onto a piece of wire as in step 1. If it’s very big or heavy you might need to double up on your wire. Push it into the middle of your bouquet, so it becomes the centre piece. If you’re using more than one space them out evenly and begin adding your button stems.
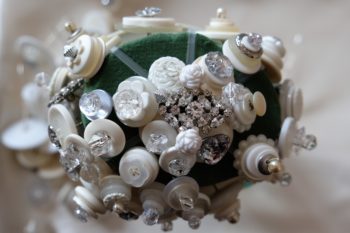
//Step 3// Button Up
Continue to add your button stems. It’s a good idea to place some of the larger and more decorative stems in evenly, as it ensures you get a professional, balanced look. Fill until you can no longer see any of the oasis – overlap is good – and it looks blooming lovely!

//Step 4// Fabric Finish
Cut a piece of fabric (we used ¼ meter). Fold in half, so it feels thicker and had an overlapped edge for around the top. Gather around your bouquet so it hides the plastic edge at the bottom of the oasis. Pin where the fabric overlaps and then tightly wrap around the handle, pinning as you go. Fold the remaining material at the bottom of the handle, so it looks neat (trim if necessary) and pin. Add a few tiny drops of super glue in the fabric folds and you’re done. Ta-da!

